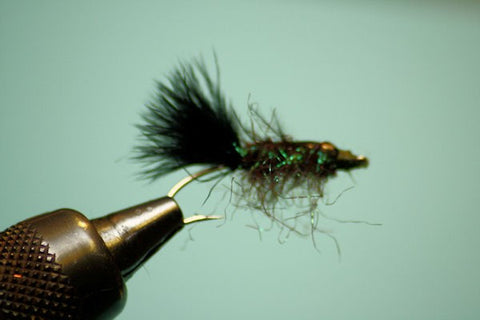
Stone-A-Mite Wiggler
Nymphs: Step-by-step fly tying instructions.
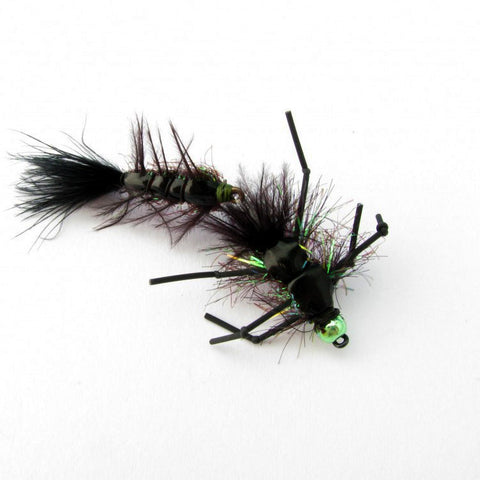
Stone-A-Mite Wiggler created by Steve Wascher.
I love fishing and tying “generic patterns for both inland trout, steelhead, and a variety of warmwater species. The “Stone-A-Mite Wiggler”, when tied in a variety of sizes and color variations is able to impersonate a wide variety of aquatic insects that live in both warm and cold water environments.
Fly tying materials
Hook: Daiichi #1130, Sizes 6-8-10, Rear Wiggle Hook - Straight eye Aberdeen hook 3/4 inch in length.
Thread: Gudebrod 6/0 or Wapsi UTC 140, black.
Head: Nymph Head® FlyColor™ brass fly tying bead, caddis green 1/8 in. (3.2 mm).
Tail: Tuft of black marabou.
Articulated Wiggler: Dubbing - Master Brite - Peacock, over which a black or olive Emu feather is laid in across the back, followed by a 1/4 inch Section of black Thin Skin, ribbed with 8 pound test brown, green or clear monofiliament.
Main Body: Loop of 12lb test mono to attach tail section.
Collar: Wound in at butt section of hook, several turns of black or olive Emu.
Legs: 3 pair of Spanflex legs , knotted to impersonate joints, tied in at various points along shank of hook.
Wing Case: 2 sections of Thin Skin cut to shape to imitate wingcases.
Dubbing: Master Brite Peacock.
Fly tying instructions
Step 1

Begin by a fixing a light wire, straight eyed nymph hook into the vise, attaching your thread with a jam knot and tying in a bunch of marabou (black) about 3/8 inches long.
Step 2
Tie in a 1.5 inch piece of black nymph skin which is approximately 3/16 - 1/4 inches wide. The Nymph Skin should protrude off the back of the hook shank.
Step 3
Attach a 3 - 4 inch piece of dark monofiliment (Maxima - 8lb. test) and a section of black or dark olive Emu. Note: both of these materials are tied in at exactly the same spot as the Nymph Skin.
Step 4

Dub a dense body using any synthetic Peacock-flavored dubbing. I personally prefer Master Bright Dubbing. Whatever dubbing you select should have some degree of 'tease-ability".
Step 5
Pull the black Emu feather forward and secure it with several thread wraps. Ensure that the barbs of the feather protrude out the side of the fly.
Step 6
Pull the Nymph Skin over the black Emu. Pull the Nymph Skin tight and secure with several thread wraps. Then rib with the mono rib. Whip finish and apply head cement.
Step 7
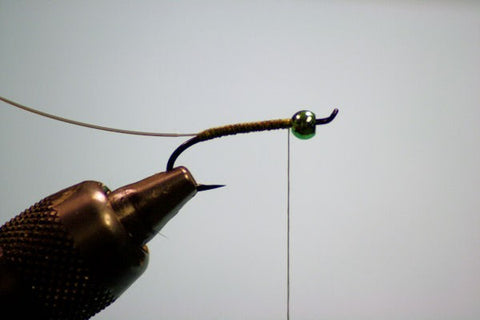
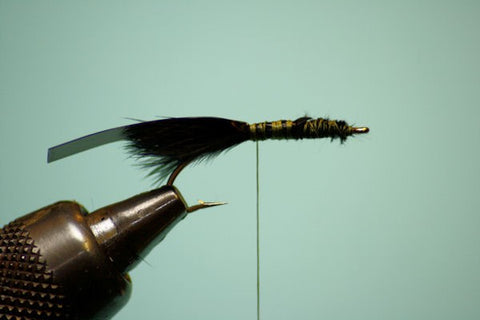
Begin by sliding the bead into position and then placing the size 8 - 10, eye up salmon fly hook into the vise.
Next, Lay down a solid thread base and tie in a 5" section of 10 - 12lb. monofiliment at the rear of the hook shank. Ensure that the mono is properly secured.
Step 8

With a pair of wire cutters, cut the bend of the hook off from the articulated body just behind the marabou tail. Then slide the mono loop which is attached to the salmon fly hook through the eye of the articulated body or tail section. The loop which retains the tail section should be no more than 1/8 inch long. But prior to tying in, ensure that the tail section has a good deal of mobility. Tie in the remainder of the mono section and glue with a good CA glue. Allow to dry!
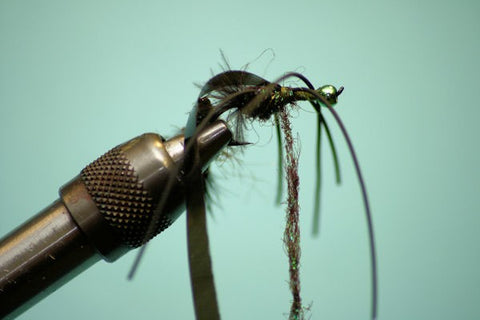
Step 9

At the rear of the salmon fly hook, tie in a section of black or dark olive Emu. Make 4 - 5 wraps and tie off the Emu. Trim Emu section and retain excess Emu for future flies.
Step 10

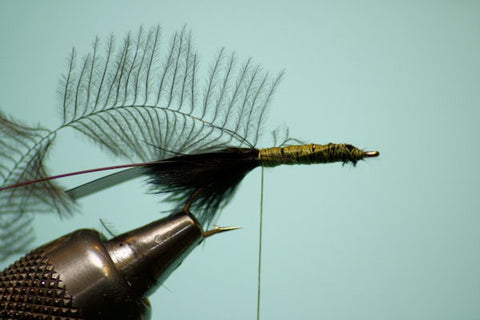
Tie in a 3 inch section of black Nymph Skin just in front of the Emu collar. Then, equally spaced apart, tie in three, 4 inch pieces of round black living rubber. Tie them in w/a figure eight method and apply a small amount of glue to each wrap. Note: You want to have an equal amount of living rubber on each side of the hook shank.
Step 11
Dub a very coarse body using the Master Bright dubbing or your favorite dubbing. Then wrap the remainder of the body with the dubbing and stop just behind the bead.
Step 12

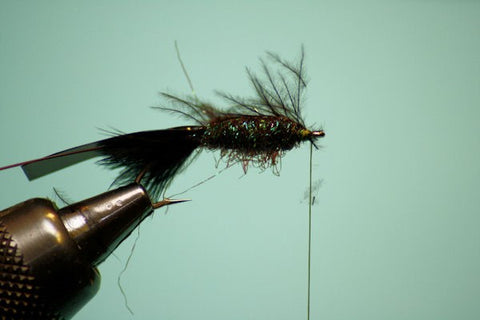
In open spirals, bring your thread back to the middle of the hook shank. Then bring forth the Nymph Skin to the middle of the shank, tie down with 4 - 5 wraps and then reverse the material and secure with 2 - 3 wraps so to give the folded appearance. Advance the thread to just behind the bead and bring the "Nymph Skin" forward. Secure behind the bead with several thread wraps and cut off excess material. Apply a liberal amount of cement. Lastly, dub a small amount of dubbing onto the thread and make 2 wraps behind the bead. Whip finish and apply more cement.
Step 13
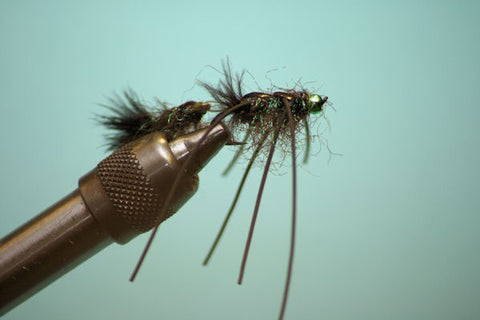
You can either knot the legs to enhance the appendages or leave them (legs) unknotted. After knotting the legs, trim to length. If you prefer not to knot the legs, simply trim to the desired length.The Stone-a-Mite Wiggler is complete!