Fish-Skull Skulpin Bugger
Streamers: Step-by-step fly tying instructions
Fish-Skull® Skulpin Bugger™ created by Martin Bawden.
Quick and easy to tie, the Skulpin Bugger™ takes the proven Wooly Bugger style of fly to a new level with a Sculpin Helmet™ replacing the traditional cone or bead for the head, rubber legs to imitate the prominent pectoral fins found on sculpins and add more action to the fly, and a hook-up orientation to avoid snags.

Fly tying materials
Hook: #6 standard Woolly Bugger streamer, down-eye.
Head: Fish-Skull® Sculpin Helmet™, size small, brown, olive, or black (as per the fly variation being tied).
Eyes: Fish-Skull® Living Eyes™, 3.0mm, gold.
Thread: Strong 3/0, color (brown, black or olive as per the fly variation being tied).
Tail: Marabou (color as per the fly variation being tied).
Underbody: Chenille (variegated if possible).
Hackle: Woolly Bugger hackle (use grizzly or a variant if possible to help promote the “mottled” effect).
Pectoral fins: Rubber or silicone legs, color (brown, black or olive as per the fly variation being tied).
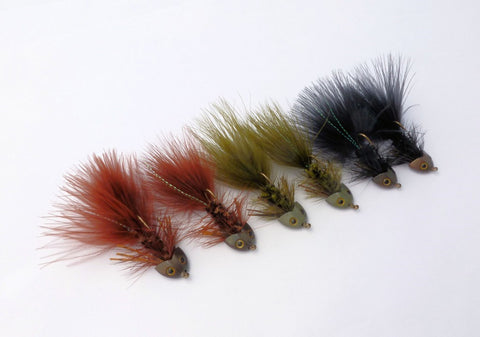
Color variations
There are 3 basic color variations designed to suit different geographic areas and fishing conditions.
Mottled olive

Sculpin Helmet (olive), marabou, hackle & chenille (olive), rubber legs (olive), thread (olive).
Mottled brown

Sculpin Helmet (brown), marabou, hackle & chenille (brown), rubber legs (brown), thread (brown).
Black

Sculpin Helmet (black), marabou, hackle & chenille (black), rubber Legs (black), thread (black).
Fly tying instructions
Step 1

Put the hook in your vise and lay a thick thread base over the hook shank. It's important to leave a clear gap between your materials and the eye of the hook to leave space for the Sculpin Helmet to be fitted from the front, so start your fly tying thread 2 to 3 eyes width distance behind the hook eye. Work backwards and wrap a thick thread base that completely covers the hook shank. Lay this thread base all the way to the back of the hook to the point where the hook starts to curve.
Step 2

Tie in the marabou tail like a standard Woolly Bugger. Tie down the marabou feathers all the way to the front tie-in point to build up bulk and create a nice, fat Sculpin body. Note: The length of the tail should be the same length as the hook shank, not longer.
Step 3

Tie in the chenille, hackle and two or three strands of krystal flash like a standard Woolly Bugger.
Step 4

Wrap the chenille forward to form a chubby underbody (remember to allow space for the Sculpin Helmet) and tie off.
Step 5

Rotate the fly into the “hook up” position. Tie in 3 or 4 rubber or silicone legs on either side of the fly to imitate the prominent pectoral fins found on a Sculpin and to provide extra movement from the fly.

This top view shows you 3 rubber or silicone legs tied in evenly on either side of the fly. The legs should not be longer than the point of the hook if they are pushed backwards. Note there is still a wide gap leaving room to fit the Sculpin Helmet. Tie a small thread head, tie off, and cut your thread.
Step 6

Fit the Sculpin Helmet to make sure it fits correctly.

If your spacing is correct, then the helmet will fit snugly against the materials and there will be a small gap left between the Sculpin Helmet and the eye of the hook.
Step 7

Apply a coating of Zap-A-Gap or your favorite super glue to the top, bottom and sides of the thread-head.
Step 8

Fit the Sculpin Helmet from the front.
Step 9

Re-attach your tying thread in front of the Sculpin Helmet and tie a strong thread dam to secure the helmet firmly in place.
Step 10

Tie-off your thread and add head cement to seal the thread wraps.
Step 11

Apply a small amount of super glue on the middle of each eye socket and stick on the Living Eyes.

The fly is ready for action!