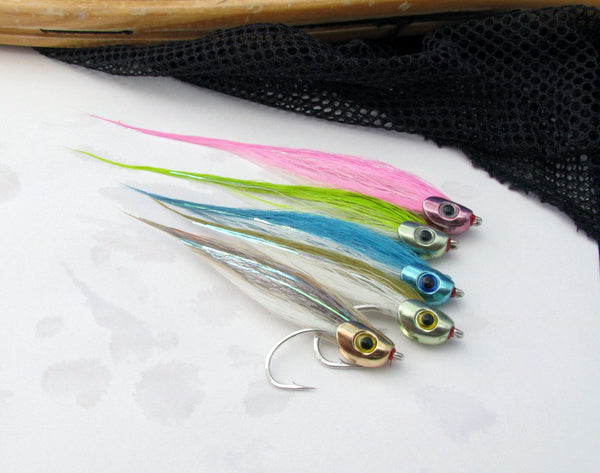
Bucktail Baitfish
Streamers: Step-by-step fly tying instructions

Bucktail Baitfish created by Martin Bawden.
This simple and minimal weighted streamer uses bucktail as its primary material.
Like most bucktail flies, the Bucktail Baitfish offers fly tiers tremendous versatility in the range of sizes and colors it can be tied in. The example shown below is about a 3 inch (7.5cm) fly, but the length can be easily changed by using longer lengths of bucktail. With good saltwater-length bucktail you could easily tie up to 6 inch (15cm) long streamers using a #3/0 or 4/0 hook and a large Baitfish Head. Likewise, the fly profile (width & thickness) can be easily adjusted by tying sparsely or more full. An endless number of different baitfish color combinations can be tied by mixing various color bucktails with the different Baitfish Head colors.
Popular colors variations include white/white, white/chartreuse, white/tan, white/olive and white/blue.
Fly tying materials
Hook: Gamakatsu SC15 wide-gap, #1/0 or #2/0 (as an option use a standard length hook).
Head: Fish-Skull® Baitfish Head™, golden chartreuse, medium.
Eyes: Fish-Skull® Living Eyes™.
Thread: Mono.
Tail: Bucktail, white.
Lower wing: Bucktail, white.
Flash: Flashabou Mirage (or your favorite flash material).
Upper wing: Bucktail, olive.
Fly tying instructions
Step 1

Put the hook in the vise. Attach the thread at least one hook eye width behind the eye of the hook. Wrap back and cover the hook shank up to the point that is in line with the tip of the hook. The main objective here is to mark out your working area and serve as a physical reminder to ensure you do not crowd the important “gap” behind the hook eye prior to fitting the Baitfish Head.
Step 2

Tie in the white bucktail tail.
The tail is approximately one shank shank in length, but feel free to make this longer or more full f you want a broader, longer fly. Form a neat white underbody by extending the bucktail the length of the hook and by spreading it around the shank to completely cover the hook. Finish in the position shown. It's also not a bad idea to add a light coating of Zap-a-Gap or similar to make your body more durable.
Step 3

Measure a length of white bucktail for the lower wing. It should be slightly longer in length than the tail.
Step 4

Tie in the lower wing.
Step 5

Tie in a 5 to 6 strands of your favorite flash material.
Step 6

Measure a length of olive bucktail for the upper wing. As before, this should be slightly longer than the lower wing.
Step 7

Tie in the upper wing and trim the butts at an angle.
Step 8

Form a thread head and tie off your thread.
Step 9

Cover your thread wraps with a light coating of super-glue (top, sides and bottom).
Step 10


Fit the Baitfish Head over the eye of the hook and position in place.
If the spacing of your materials was correct, the eye of the hook will protrude out the front of the Baitfish Head.
Step 11

Re-attach your tying thread and tie a small thread-dam between the front of the Baitfish Head and the eye of the hook.
Feel free to change your thread color to suit the pattern you are tying. Use white or mono thread if you want the thread wraps to be invisible, or use a different color thread to accent the fly color. In this example I am using a red color thread.
Step 12

Tie off and add a spot of head cement to your thread wraps.
Step 13

Turn your fly on its side. Add a small spot of super-glue to the center of the eye socket and stick on 1 Living Eye. Turn over and repeat on the other side.
Step 14


Your fly is complete! Now go catch a big fish.

