Fly Tying Tutorial: Learn to Tie the Faux Daddy Fly With Rune Andre Stokkebekk

Imitations of craneflies are very popular in Europe and not without reason, they are great, buggy fishing flies!
Even though it’s not that often you encounter a real “hatch” of these insects, they tend to be present during most of the summer and trout will take them if they crash land.
I tie these flies in 3 sizes and fish them quite often, not just to imitate craneflies, but more to show fish something that looks very tempting when they are opportunistic (which they are most of the time).
Over time, I've tried using many different materials for legs: Pheasant tail fibers, fireline, moose body hair, and more. Last summer and fall I started using Fish-Skull Faux Bucktail fibers for the legs, and I think Faux Bucktail conquers all the other materials. Faux Bucktail fibers are almost indestructible and quite easy to work with.
For the smallest of the Faux Daddy flies (the Mini Daddy) I just tie a knot on the fiber and tie it in, then secure the wrappings with superglue to keep it in place.
For the medium (Midi) and large Faux Daddy I have developed a way to knot the legs that makes them sit properly and keeps them secure on the hook without any glue. This is the key feature of this fly tying tutorial.
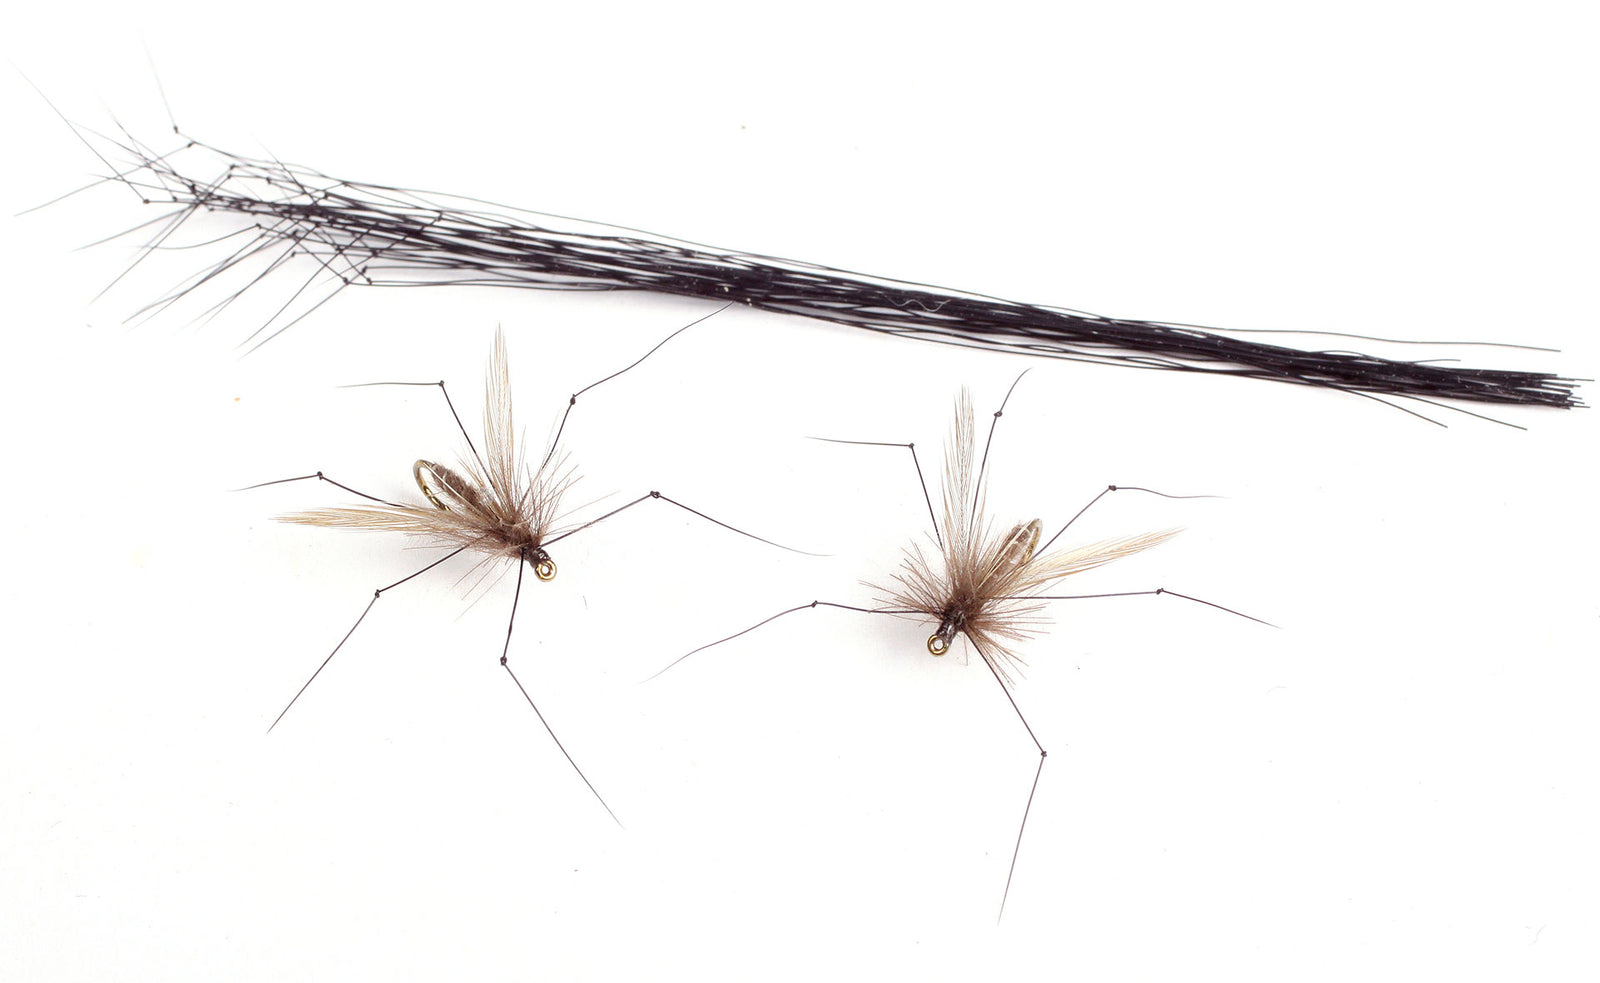
The 3 Styles/Sizes of the Faux Daddy Fly
Faux CDC Daddy

- Thread: Gray or brown, UTC 70 Denier or Uni 8/0
- Hook: Tiemco 112TR size #11, short shank, wide gap
- Abdomen: Gray/brown vernille, floatant chenille
- Wings: Gray/blue dun cock hackle tips (Indian)
- Dub Ball: Flyrite nr. 19 or 20
- Legs: Fish-Skull Faux Bucktail, black
- Hackle: Mix of natural brown and dark gray CDC
Faux Midi Daddy

- Thread: Gray or brown, UTC 70 Denier or Uni 8/0
- Hook: Tiemco 100 #12 or similar (such as the Kona Universal Dry Fly hook)
- Body: Flyrite nr. 19 or 20
- Rib: Pearl Krystal Flash
- Wings: Gray/Blue dun cock hackle tips (Indian)
- Legs: Knotted Fish-Skull Faux Bucktail, black (this technique is outlined in the article below)
- Hackle: Grizzly hen hackle
Faux CDC Mini Daddy
- Thread: Gray or brown, UTC 70 Denier or Uni 8/0
- Hook: Tiemco 100 #14 or similar (such as the Kona Universal Dry Fly hook)
- Body: Natural brown cdc wrapped like a rope
- Rib: The thread, counterribbed
- Wings: Gray/Blue Dun Cock hackle tips (indian)
- Legs: Knotted Fish-Skull Faux Bucktail, black (this technique is outlined in the article below)
- Hackle: Mix of natural brown and dark gray CDC
Regarding the fly styles/sizes and when to use each — I often fish with the large and medium size in summer and use the Mini Daddy in the fall and on rivers when fish are accustomed to feeding on smaller insects. Here in Norway we have many species of smaller daddies during autumn and the Mini Daddy is very effective from September to November.
All three sizes are excellent all-round imitations and attractors. Choose the size that you feel will best trigger the fish. If the fish is a little cautious or picky, try the small one!
The Knotted Faux Bucktail Legs Technique on the Faux CDC Daddy
Step 1

Use a lighter to make the tip of the chenille rounded and tapered. Fasten the chenille where the thread is at the hook point. The length protruding out the end of the hook bend should be similar to the length of the hook shank. Total from hook eye to end of body is 18 mm or so. Cut it at the point where the thorax ends, as shown above. Put some superglue on your thread when you tie down the chenille.
Step 2

Take a Faux Bucktail fiber and make a knot at the center. Fold the fiber and use both your thumb and index finger to tighten the knot so you get an angle of 45 degrees.
Step 3

Fasten the Faux Bucktail legs on top of the hook with 3 to 4 turns of thread behind the knot. This will prevent the legs from sliding.
Step 4

Use a heated needle to make kinks/joints on the legs. I place the needle just above a candle and heat for 3 to 4 seconds. Don’t press the needle too hard, doing so could cut the fibers. First, pull the legs down against the needle, about 10 mm from the hook.

Then make the second joint by using the needle again another 10 mm or so from the first joint.

The two rear legs are now finished.
Step 5

Dub a small ball where you tied in the legs. Make it a bit higher than the rest of the body. This ball will raise the wings, spread them out, and make sure they dont get tangled in the hook bend.
Step 6

Tie in the hackle wings on top of each other and spread them out with your fingers. Make tight thread wraps towards the dubbing ball to set the position of the wings.
Step 7

Make a dubbing loop with your thread and close it on top with the thread around it.
Step 8

Place the dubbing loop out of the way and make a nice even foundation for the rest of the tying with your thread. Place the thread at the center of the thorax area.
Step 9

Make two new sets of legs like how you made the first set, and let them slide under the thread. Position them on the side of the hook and make tight turns behind the knot.
Step 10

Then, make tight turns in front of the knot. Now the legs are secure and will not be possible to pull out. They also have the correct angle for the rest of the legwork.
Step 11

It's time to make joints on the legs like you did on the first set. Here I have started with the center legs, first one joint each leg about 10 mm into the fiber, this one I've angled forward. Then the second joint I pull slightly back and down.

The front legs are now finished, one joint bending the legs slightly towards the front of the fly and the second just a little back and down.

This is how it looks from the side. Trimming the legs is the last thing I do. But you can cut off a little now if that makes the CDC spinning and wrapping in easier.
Step 12

Next up is the CDC. You need fiber length of at least 15 mm. I even out the tips a bit with a scissor before I put them in the clamp. The image above is one side of two CDC feathers placed in the magic tool.
Step 13

Place the CDC just a couple millimeters inside the dubbing loop and spin so the thread starts to clump at top. Tie in with a round just in front of the wings, a round between the front and center legs, and a couple rounds in front of the front legs. Try to stroke the fibers back and up for each turn.
Step 14

Use a toothbrush to rough up any trapped fibers. You can cut them quite short on the underside.
Step 15

Finally, cut the legs to the your desired length when looking at the fly from above. Length of a leg should about 25 mm if stretched fully out.
Floatant tip!
When I start fishing with a fresh fly out of the box, I add CDC oil on the hackle and wings gently and sparsely with my fingers. After catching a fish on it, stir the fly in the water, do a series of false casts, give it a round in the amadou drier and use a dry shake brush to revitalize the CDC hackle fibers, then put gel or CDC oil on the body. CDC hackled flies can take a few fish before they need a rest, so make sure you have several for a day of fishing. Don't just put them wet into the box, dry it with the amadou drier and let the fly air dry on your vest if possible.
Want More Content Like This?
Join the Flymen Mailing List at the Bottom of the Page!
About Rune Andre Stokkebekk:

Rune Andre Stokkebekk works for Guideline Fly Fishing Equipment and has been trout fishing for 30 years. Rune has written numerous articles for Norwegian magazines and websites and teaches both fly tying and fly casting.
more fly tying instructions
Hi Al H,
The author here :-)
The furry foam i have soaks up water and is hard to shape properly. I would rather use standard 2mm foam in Tan or Grey and make an extended body with tying thread segments as we ofthen do with large mayfllies etc. Alternatively you can use a foam cylinder and make a nice tip on it. The reason why i use the vernille/floatant chenille is that it does not give as much resistance in air as the foam. Large foamflies can have a nasty habit twisting leaders if you go thin, have too thight loops and cast a lot.
/Rune
Can the body or other parts be made with a furry foam ?
These look like good patterns for the Pennsylvania Limestone Streams in Central Pa. Thanks!
These look like good patterns for the Pennsylvania Limestone Streams in Central Pa. Thanks!
Leave a comment