Vern-O's Dace Shank Fly
Streamers: Step-by-step fly tying instructions
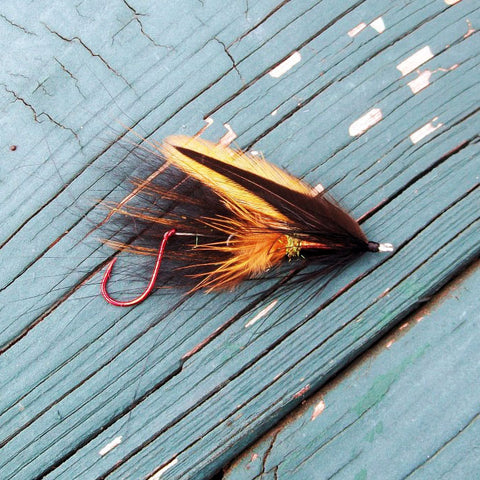
Vern-O's Dace Shank Fly by Vern-O Burm.
This beautiful, streamlined fly imitates a black-nosed dace minnow. Most of the action comes from the rear of the fly as the bulky rear section compresses and swims when wet. It's a great example of how the Fish-Skull® Articulated Shank™ can be used as a simple, but key component when tying in free-swinging stinger-hook style articulated flies.
Fly tying materials
Trailer hook: Octopus-style, size to match.
Connecting monofilament loop: 20 pound test.
Shank: Fish-Skull® Articulated Shank™, 35 mm.
Thread: 6/0, black.
Blood Spot: Wool yarn, red.
Tail support and return loop cover: Olive ice dubbing.
Tail: Arctic fox tail, black.
Rear hackle: Pheasant rump, dyed orange.
Body: Mini flat braid, copper color.
Front hackle: Pheasant rump, dyed black.
Wing: Furnace hen cape hackle tips.
Color variations

Fly tying instructions
Step 1

Attach a loop of monofilament to a trailer hook. Leave the ends of the monofilament open.
Step 2

Secure an Articulated Shank in your vise. In this case it’s a 35 mm shank.
Step 3

Attach tying thread to shank and secure thread around the return loop of the shank.
Step 4

Place the open ends of the monofilament on each side of the shank and secure with tying thread and a dab of super glue. Judge a reasonable distance between the end of the shank and the trailer hook. If the distance is too long you may foul-hook fish and if the distance is too short you may not be able to replace the hook if needed.
Step 5

Attach a piece of red wool yarn with your tying thread and form a small ball that will serve as trigger spot or blood dot.
Step 6

Dub a small clump of ice dubbing to serve as a cover for the return loop and to help support any hackle or tailing material to be added.
Step 7

Place a small clump of arctic fox tail on the top of the shank to serve as a tail. I like the slim swimming action of the arctic fox when wet. I do not use a hackle to support the tail on this pattern as I prefer the slim tail look. You're creating a more streamlined profile.
Step 8

Add another clump of arctic fox to the bottom of the shank. Try and keep it sparse, you can always add more as needed. Repeat this step for the sides if you desire.
Step 9

Attach a pheasant rump (dyed orange in this case) with the shiny side facing forward by the tip with your tying thread. I prefer to get in some of the fluffy fibers when I wrap the hackle, so judge how far up the tip to secure. The goal is to get 3 or 4 turns of the hackle with the last turn having some fluffy fibers.
Step 10

Make 3 or 4 wraps with the pheasant tail rump feather and secure it with your tying thread and trim the stem. Stroke the fibers back and take a few wraps of thread to push the fibers rearward. This step helps create the appearance of side to side swimming motion and any fins near the rear of a minnow.
Step 11

Add a small pinch of dubbing to cover the thread wraps where the hackle was secured. Attach a strand of mini flat braid (copper color) with your tying thread.
Step 12

Advance your thread forward and wrap the flat braid forward and secure with your tying thread. Trim the waste.
Step 13

Attach a pheasant rump (dyed black) with the shiny side facing forward by the tip. Trim the waste. Normally I would tie and wrap the hackle the same as the rear hackle, but I want to keep the head portion smooth, small, and flat as possible. By not wrapping the hackle with as many fluffy fibers I reduce the head size because the stems tend to get thicker the closer you are to the fluffy fibers. The thicker the stem, the more difficult to secure with thread wraps. The more thread wraps the bulkier the head. If you envision the head area of a minnow there's not a lot of movement. The front pectoral fins on a minnow are more for stability.
Step 14

Try and make 3 nice wraps of hackle and stroke the fibers toward the rear and trim the waste.
Step 15

Select 4 furnace hen cape hackles. Try to select two feathers from each side of the neck, so that they have similar curves. Then take the hackles and measure them to so that they extend past the end of the shank roughly where the trailer hook eye starts. If uncertain, go shorter and closer to the end of the shank. Once you've measured the feathers, strip the fibers beyond that point off and expose the stems. Place the feathers with the shiny sides facing out. Be sure the keep the feathers separate so that you can match them correct from each side of the neck in which they were removed. Unless you have perfectly straight hackles, you will want to set the feathers so that the tips curve toward the shank like the shape of a frown as opposed to curving upward.
Step 16

Take the two feathers from one side of the neck and match them up so that the tips are even and the same amount of fibers have been removed and the shiny side is facing out. Take the other two from the other side of the neck and do the same. Now place all four feathers together. It should be like putting your hands together in prayer fashion, only there are two feathers for each hand. Place the feathers on top of the shank with the bare stems going through the hook eye. This part is optional, but I feel it gives the fly more durability. Try to pinch the feathers and the shank at the same time with the same hand and secure with a loose wrap first and then without letting go of the shank and the feather make at least three snug wraps of thread. Carefully let go of the shank and feathers to see if the feathers are positioned correctly. If not, undo the thread wraps and retry. This is the critical part, if they don’t look right now, they won’t look right later. Take the time to do it right.
Step 17

Top view to show the cupping of the feathers like prayer hands.
Step 18

Once you have them positioned and secured well, take the stems which are placed through the eye and push them rearward and secure with thread wraps and trim the excess. Build a nice smooth thread head and whip finish.
Step 19

Trim your thread and add some head cement.
Step 20

You should have a nice, streamlined fly that represents a black nosed dace minnow. The bulky rear section will compress and swim once it is wet. Most of the action should come from the rear of the fly.
Now go fishing!