The Chili Pepper
Nymphs: Step-by-step fly tying instructions.
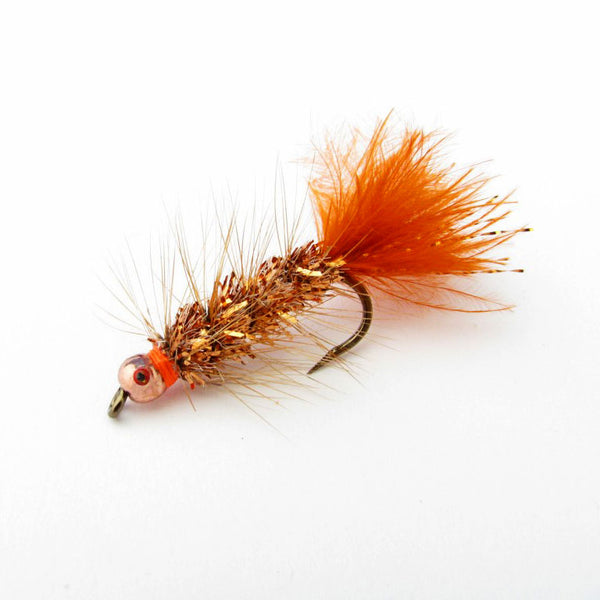
The Chili Pepper created by Tony Spezio.
The original Chili Pepper was tied by Bob Root as a joke.
I would not fish “Woolly Bubbers” as he called them. Bob gave me that fly on the river one day many years ago. I told him I would not put that gaudy fly in my box let alone fish it. I stuck it in my box and there it stayed about six months!
Bob finally talked me into using it one day when things were slow. Tied it on and made a cast. A nice brown, made a second cast and another trout, again and another! Thirteen trout in a row and broke off on the fourteenth! We both were astounded.
I know it doesn’t sound real, but I gave Woolly Bubbers a second thought. That was the only one Bob had tied. Needless to say, he went home and tied up a bunch more. We caught a load of fish of all types on the “Gaudy Bugger” as we called it. Then it was called “The Hot Number”, then finally, “The Red Hot Chili Pepper”.
The Pepper has caught all types of fish here in the USA and a number of countries in Europe. I fish it down and across with a twitch, fast stripping, Dead drift and just about any way you want to fish it. A deadly way is to cast it down and across, twitch it while it is drifting, let it make the swing then let it sit there for a few seconds. Work it back upstream with a forward pull, then let it fall back like an injured bug. The strikes will be solid with a lot of break offs if the line is not held loose in your retrieve hand.
Over the years, I have caught and released over 3000 fish on the Chili Pepper. It's my go-to fly.
Fly tying materials
Hook: Size #14 to #2 streamer hook, 3 or 4X long.
Bead: Nymph-Head Heavy Metal tungsten fly tying bead to fit hook size, gold or copper.
Weight: Lead wire.
Thread: Fire orange.
Tail: Burnt orange marabou.
Tail Flash: Copper flashabou.
Hackle: Conranch chili pepper saddle hackle (you can also use brown, ginger, or furnace).
Body: Copper tinsel chenille.
Collar: Fire orange thread.
Fly tying instructions
Step 1

Put the bead on the hook and then hook in the vise with the hook point through the small hole on the bead.
Step 2
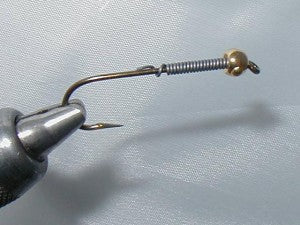
Wrap just enough wire on the shank to hit in the bead recess and to about 2/3 thirds of the hook shank.
Step 3
Note the tag end of the wire. This is left to wrap the thread on it to keep the wire from rolling.
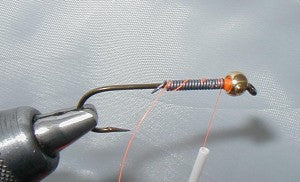
Step 4

Wire wrapped with thread, wrap thread back to the barb then back to the wire. This is the marabou tie in point.
Step 5
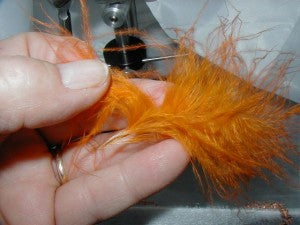
Take a Marabou plume and strip off a bit of Marabou off the stem.
Step 6
Tie in the Marabou just behind the wire to start a smooth transition.
Step 7

Pinch off the tail then take what you pinch off and tie it in on top of the first marabou. I pinch the tails shorter than most to keep from getting short strikes. If you prefer longer tails feel free to do it that way.
Step 8
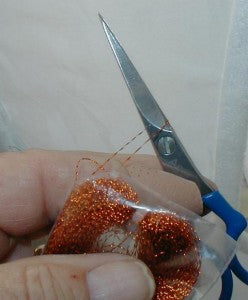
Cut the corner off the flash package, this makes it easy to pull individual strands. In this case I pull out two strands with the point of my scissors.
Step 9

Fold the two strands of flash on the thread, this will give you four strands of flash.
Step 10

Sliding the flash up the thread allows you to position the flash where you want it. In this case, on the far side of the tail.
Step 11

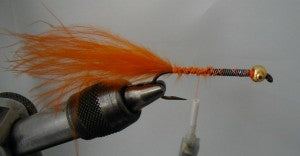
The far side tied in, repeat for the near side.
Step 12
The flash tied in, bring the thread back fwd to the end of the wire.
Step 13

Conranch chili pepper saddle has all the colors in the Chili Pepper. Other hackles like brown ginger and furnace will work well.
Step 14
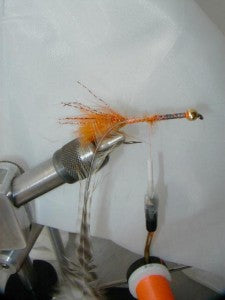
Tie in the hackle. I tie it in by the tip with the dull side facing me. This allows the hackle to make a twist on the first wrap and the dull side will be to the rear.
Step 15

Tie in the chenille in the length behind the wire.
Step 16

Wrap the chenille forward to form the body.
Step 17

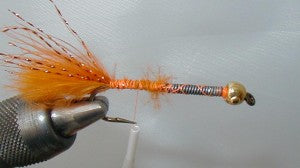
Lift the hackle straight up to start the wrap this will reverse the hackle so that the dull side is against the body. The hackle is wrapped flat on the body. Also note that the barbs are stripped off the stem where it will get the last wrap. The last wrap is made with a bare stem for a clean finish.
Step 18

Finish off the wraps with a fire orange collar.
Step 19

Add a dot of red from the tube of tulip fabric paint.
Step 20

Add a spot of black for the pupil. Allow to dry and then finish off the eyes with a spot of Sally Hansen’s Hard-As-Nails for added durability during fishing.
Now go catch some fish!