Red-Headed Sparrow
Nymphs: Step-by-step fly tying instructions.
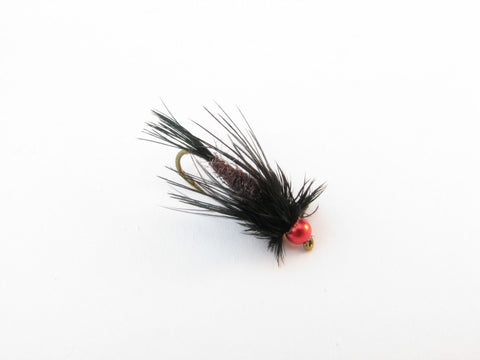
Red-Headed Sparrow created by Rob Galante of East Coast Flies.
The original fly, “The Sparrow,” was created by the late Jack Gartside. As Jack said, “It’s one of those flies that looks like everything and nothing. It has lifelike qualities that attract fish and make them want to take.” It’s a wonderful creation that can be tied in many colors. The pattern calls for feathers from a Ring Neck Pheasant skin. The skins are available in many colors like natural, olive, black, yellow, red, and orange. The original fly didn’t call for any bead. By adding a colored bead or a colored tungsten nymph head bead you can create a weighted pattern and one that adds a little flash or color to the fly. With the wide variety of colors that the Nymph-Head beads are available in the color scheme is pretty much up to your imagination. I have good luck with the Red-Headed sparrow on brookies in a northern New Hampshire pond I frequent.
Fly tying materials
Hook: Daiichi 1710/1720 or TMC 5262/5263 # 8 The first is a 2X and the other is a 3X. Choose the hook and size based on the natural you want to imitate.
Thread: Danville 6/0, black.
Head: Nymph-Head® FlyColor™ brass fly tying bead, bloodworm red.
Body: Black Antron mixed with Jack Gartside Secret Stuff, peacock blaze olive.
Tail: Lower back feather (rump) equal to the length of the body.
Hackle: Lower back (rump) feather. The hackle should be long enough to extend at least to the bend of the hook.
Collar: 2 after-shaft feathers wound around the shank in front of the hackle.
Fly tying instructions
Step 1

Select a feather from a dyed black Ringneck Pheasant skin. I use the lower back feathers for the tail but you could really use almost any feather on the skin. Towards the top of the skin there is a marabou type feather that works very nice. We are going to use about a half of an inch of the tip of the feather for the tail. Holding the tip of the feather and about half an inch back pull back the remainder of the barbs. You can remove these barbs completely, which will leave just the stem. Roll the barbs that are left near the tip into a bunch that will be used as the tail. The tail should be about the length of the body.
Step 2

Tie the feather in at the bend of the hook. Cut off the remaining stem.
Step 3

The dubbing you use can be anything you like. I like my dubbing to have some sparkle mixed in which is why I sometimes mix my own dubbing. I use black antron and chopped up olive colored Secret Stuff from Jack Gartside. You can use angel hair if you don’t have the Secret Stuff. Hareline sells ice dubbing, which has a great sparkle and comes in a variety of colors.
Step 4

I dub the fur on the thread and beginning at the bend of the hook I wrap a nicely tapered body. Leave enough space for the hackle and collar.
Step 4

The legs of the insect will be imitated with a lower back feather from a Ring-neck Pheasant skin dyed black. It’s the same feather as the tail. You prepare the feather by holding it by the tip and stroking the barbs perpendicular to the stem. You’re only going to make 2 turns around the hook so you will only use about 3/8” of the barbs. You can strip the rest of the barbs from the stem.

Tie in the hackle by the tip and wrap it around the hook. Fold the hackle towards the back of the hook as you wrap it. You are using this hackle to imitate legs and provide action in the water.
Step 5

Now you get to use a delicate but very effective feather called an aftershaft feather. You will find this feather behind most of the feathers on a Ringneck Pheasant Skin. It is used as a collar and creates great motion in the water. It is a delicate feather and you have to be very gentle when wrapping it. Put two feathers together and tie in the feather by the base of the feather. I try to get as many wraps of this feather as I can. I use my fingers, folding the feather back as I wrap it. Tie it off, cut the excess and whip finish. Use a thin head cement and put a few drops right behind the bead.

The finished Red-Headed Sparrow.