Fish-Skull Skulpin Bunny
Streamers: Step-by-step fly tying instructions
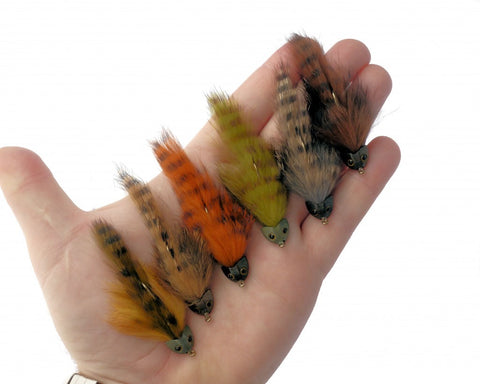
Fish-Skull® Skulpin Bunny™ created by Martin Bawden.
The Skulpin Bunny™ has proven itself on rivers worldwide as the ultimate go-to trout and smallmouth bass pattern with irresistible natural movement. This simple, understated fly demonstrates how a few quality fly tying materials can be combined to produce an effective fly. The Sculpin Helmet™ is matched with Hareline Dubbin's amazing range of barred and variant rabbit strips to produce an endless number of color combinations. This allows you to create flies to match a wide variety of local fishing conditions or target species.

Fly tying materials
Hook: #4 standard streamer, 4XL, down-eye (or similar).
Head: Fish-Skull® Sculpin Helmet™, small size, brown, olive, or black (as per the fly variation being tied).
Eyes: Fish-Skull® Living Eyes™, 3.0mm, gold.
Thread: Strong 3/0 or similar thread, brown or olive (as per the fly variation being tied).
Tail & Back: Hareline Dubbin, rabbit strip, straight-cut (1/8" wide), color as per the fly variation being tied.
Body & Fins: Hareline Dubbin, rabbit strip, cross-cut (1/8" wide), (color as per the fly variation being tied).
Color variations
There are 6 different color variations designed to suit different geographic areas, fishing conditions and target species.
Grizzly

Sculpin Helmet™ (brown), rabbit strip, straight-cut (Hareline Dubbin, black-barred, grizzly), rabbit strip, cross-cut (Hareline Dubbin, grizzly, natural HE), thread (brown).
Brown

Sculpin Helmet™ (brown), rabbit strip, straight-cut (Hareline Dubbin, black-barred, medium brown), rabbit strip, cross-cut (Hareline Dubbin, dark brown), thread (brown).
Crawdad

Sculpin Helmet ™(brown), rabbit strip, straight-cut (Hareline Dubbin, black-barred, crawfish orange), rabbit strip, cross-cut (Hareline Dubbin, craw orange), thread (brown).
Sand

Sculpin Helmet™ (brown), rabbit strip, straight-cut (Hareline Dubbin, black-barred, gold variant), rabbit strip, cross-cut (Hareline Dubbin, gold variant), thread (brown).
Yellow-Olive
Sculpin Helmet™ (olive), rabbit strip, straight-cut (Hareline Dubbin, black-barred olive variant), rabbit strip, cross-cut (Hareline Dubbin, gold), thread (olive).
Olive

Sculpin Helmet™ (olive), rabbit strip, straight-cut (Hareline Dubbin, brown barred olive), rabbit strip, cross-cut, Hareline Dubbin, olive variant), thread (olive).
Fly tying instructions
The Skulpin Bunny is tied and fished in the hook-up position. Therefore, the easiest method is to rotate your vise so the hook faces upwards and build your fly from that position.It is very important that you leave a clear “gap” between your materials and the eye of the hook. The gap provides space for the Sculpin Helmet™ to be fitted from the front of the hook over the materials and be secured in place.
Step 1

Start your fly tying thread approximately 2 to 3 eyes width distance behind the hook eye. Work backwards and wrap a thick thread base that completely covers the hook shank. Lay this thread base all the way to the back of the hook to the point where the hook starts to curve. At the back end-point, make 6-10 thread wraps to form a small “thread ball.” This ball at the back will help secure your rabbit strip firmly in place.
Step 2

Prepare a strip of rabbit strip (straight-cut) that will be used for the tail and back of the fly. The strip should measure between 5.0cm to 5.5cm in length (a little over 2 inches). Cut a small "V" to help create a tapered tail at the back of the fly.
Step 3

Tie in the rabbit strip. To position correctly, place the rabbit strip as shown against the hook. Important: Make sure the front of the rabbit strip is positioned slightly past the tie-in point at the front of the hook as shown below. Take a red marker pen and make a dot that lines up with the tie-in point at the back of the hook shank. This red dot is the spot where you will poke the point of the hook through the rabbit strip.
Step 4

Poke the hook through the rabbit strip as shown.
Step 5

Take the hook out the vice, re-position the rabbit strip so that lies straight on top of the hook and put back it in the vice. Brush back the rabbit fur using a comb or wire brush so that it is straight and evenly distributed on either side of the hook.
Step 6

Pull back the rabbit fur at the tie-in point so that the leather of the strip is completely exposed. This is important to ensure that no fur fibers are tied down by the thread when the rabbit strip is tied down.
Step 7

As you tie down the rabbit strip, the sides of the strip should fold evenly over both sides of the hook shank. Important: All of the thread wraps should be placed in exactly the same place (i.e. on top of each other and not side-by-side). The first 2 thread wraps should be fairly loose to hold the strip in place and then the following 3 or 4 wraps should be tied in as tightly as possible. Use a very strong thread that allows you to put a lot of pressure on the rabbit strip.
Step 8

Lift up the rabbit strip and do at least 10 tight wraps directly underneath the rabbit strip. This secures the strip firmly in place.
Step 9

Wrap your thread forward to the middle of the hook shank.
Step 10

Brush back the rabbit fur using a comb or wire brush so that it is straight and evenly distributed on either side of the hook.

This is the top view of the fly. The rabbit strip and fur is straight and even. The back tie-in point is total covered by the rabbit fur and cannot be seen.
Step 12

Measure the cross-cut rabbit strip, so that the tips of the rabbit fur extends slightly past the back of the hook as shown. This correct positioning is important. Tie in the tip of the rabbit strip firmly and wrap your thread forward to the tie-in point at the front of the fly.
Step 13

Put a very light coating of Zap-A-Gap or Super Glue on the hook shank and rabbit strip. This will help you build a stronger, more robust fly.
Step 14

Wrap the cross-cut rabbit forwards using tight, side-by-side wraps. Pause after each wrap and stroke back the rabbit fibers to make sure they all face towards the back of the fly. Depending on how thick the rabbit strip is, you will reach the front tie-in point after using 3, 4 or 5 wraps. When you reach the front tie in point, do 1 extra wrap over the previous wrap. (This extra wrap helps build out a little more bulk at the front of the fly to get that sculpin profile).
Step 15

Tie off the rabbit strip.
Step 16

Using your fingers, evenly separate the rabbit fur on the top of the fly down the middle, i.e. to the left and right of the hook shank.
Step 17

Next, pull the straight piece of rabbit strip down over the cross-cut rabbit strip and tie in firmly at the front of the fly. (This is the same “pull over” technique as if you were making the wing case of a nymph). Brush back the rabbit fur using a comb or wire brush so that it is straight and evenly distributed on all sides of the hook.
Step 18

The straight-cut rabbit is stretched as tightly as possible over the underbody and tied in firmly at the front of the fly using strong thread wraps. Brush the fiber straight.

The basic tail and body of the fly is now complete. It consists of a single, straight-cut rabbit strip running from the front to back of the fly that represents the back and tail of the sculpin. It also includes a single cross-cut rabbit strip wrapped around the shank of the hook to form the under-body and front fins of the fly.
Step 19

Fit the Sculpin Helmet to check that it fits correctly.

If your spacing is correct, then the helmet will fit snugly against the materials and there will be a small gap between the Sculpin Helmet and the eye of the hook.
Step 20

Apply a coating of Zap-A-Gap or your favorite super glue to the top, bottom and sides of the thread head.
Step 21

Fit the Sculpin Helmet over the eye of the hook and position in place.

Note: You now have about a minute to make any final adjustments to your materials before the super glue dries. For example: pull out the sides of the cross-cut rabbit so that they flare out like the fins of a sculpin.
Step 22

Reattach your tying thread in front of the Sculpin Helmet and tie a small thread dam to secure the Sculpin Helmet firmly in place.
Step 23

Tie-off the thread and add head cement to seal the thread wraps.
Step 24

Apply a small amount of Super Glue on the middle of each eye socket and place on the Living Eyes. Seal with UV glue for extra durability.
Step 25

Brush the fly using a comb or wire brush to make sure the rabbit fur is straight and evenly distributed on either side of the hook.

You’ve now tied the Skulpin Bunny. Go catch a big fish!