Evolution Stonefly
Nymphs: Step-by-step fly tying instructions.

The Evolution™ Stonefly was inspired by Kauffman’s Stonefly and is tied in a similar way. The profile of this popular, proven stonefly pattern is enhanced by a Nymph-Head® Evolution™ Stonefly tungsten beadhead and using barred rubber legs to create more action as the fly drifts across the riverbed.

Fly tying materials
Head: Nymph-Head® Evolution™ Stonefly tungsten beadhead, brown, black, or gold.
Hook: Curved nymph/stonefly hook 3XL; #6 for large bead, #8 for medium, #10 for small.
Thread: Brown, black, or gold.
Lead wire: Standard.
Rib: Vinyl D-Rib (small or midge size), brown.
Antennae: Goose biots; brown, black, or tan.
Tail: Goose biots; brown, black, or tan.
Wingcase: Turkey feather; brown, black, or tan.
Abdomen: Hareline Hare's Ear Plus Dubbin; Dark hare's ear, black, gold.
Thorax: Hareline Hare's Ear Plus Dubbin; Dark hare's ear, black, gold.
Legs: Barred rubber legs, brown/black.
Fly tying instructions
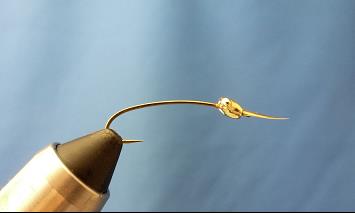
Step 1

These instructions are for the Golden Stonefly variation. Slip the Evolution Stonefly beadhead onto the hook and position hook in vise. Slip the beadhead out of the way to the back of the hook. Attach your tying thread directly behind the eye of the hook and make several thread wraps as shown.
Step 2

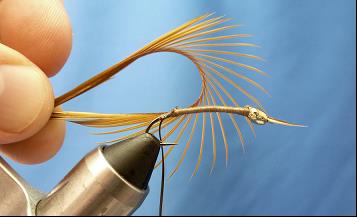
Select two goose biots to use for the front antennae.
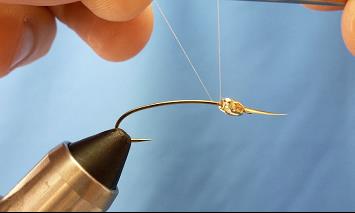
Step 3

Tie in the goose biot antennae at the hook eye. Tie-off your thread and cut your thread.
Step 4
Slip the Stonefly beadhead forward to the front of the hook. Position it over the tie-in point of the goose biot antennae.
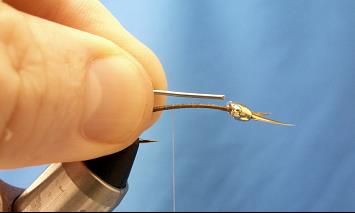
Step 5
Slip the Stonefly beadhead forward to the front of the hook. Position it over the tie-in point of the goose biot antennae.
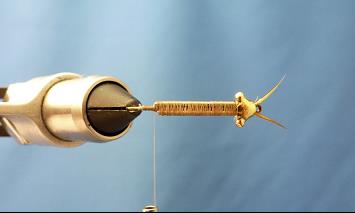
Step 6

Wrap a thick base layer of thread over the entire length of the hook shank as shown.
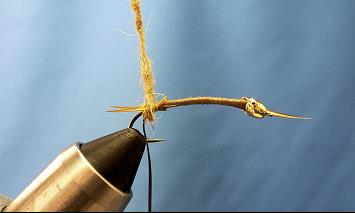
Step 7

Tie two straight lengths of lead-free wire on both sides of the hook shank to create a flat, broad stonefly body profile. The length of each wire is about two-thirds the length of the hook shank. Push the wire ends inside the beadhead on both sides and cover completely with your tying thread.
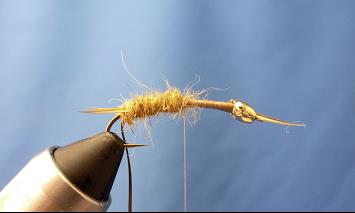
Step 8
Cover the lead wire completely with thread and move your thread to the back. It should look like this.
Step 9

Tie in a length of D-Rib for the ribbing of the abdomen. Once tied in, the D-Rib should be positioned underneath the hook shank as shown (this keeps it out of the way while you tie in the tail).
Step 10


Use a small amount of dubbing and wrap a small dubbing ball at the point where you intend to tie in the goose biot tails.
Step 12

Select two goose biots for the tail and tie them in.
Step 13
Dub a thick, shaggy abdomen approximately half the hook length
Step 14

Rib the fly by wrapping the v-rib forward in the opposite direction to how you dubbed the abdomen and tie-off.
Step 15

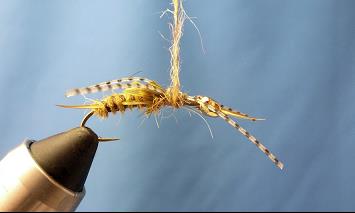
The next step is to dub the thorax part of the fly which includes adding 3 wingcases and some rubber legs. Select a length of mottled turkey feather and cut a V-shaped notch on one end to imitate the shape of a stonefly wingcase.
Step 16

Tie in the first wingcase as shown. Secure in place with 3 or 4 tight thread wraps. The tight pressure of the thread wraps on the feather wingcase will cause it to lift slightly off the body of the fly.
Step 17

Make several wraps of dubbing over the thread wraps. This covers up the thread wraps and starts building out the thorax section of the fly.
Step 18

Trim off the excess turkey feather.
Step 19

Repeat the same process to create the second wingcase. Tie in the turkey feather wingcase and then dub over the thread wraps.
Step 20
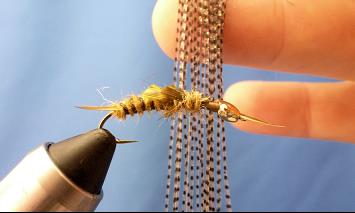
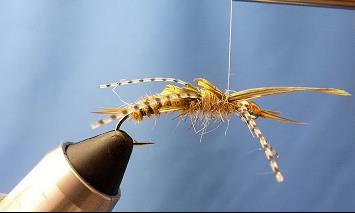
Select a single strand of barred rubber legs.
Step 21

On one side of the fly, tie in a single strand of barred rubber legs in front of the second wingcase as shown. Secure in place with several tight thread wraps.
Step 22

Do the same as Step 21 on the opposite side of the fly. Tie in a single strand of barred rubber legs in front of the second wingcase as shown. On each side you should now have a set of back legs and a set of front legs.
Step 23
Use 3 or 4 dubbing wrap to dub over the section of the thorax where you tied in the rubber legs. This dubbing will cover up the tie-in point of the rubber legs and build out the thorax area.
Step 24

Select a length of mottled turkey feather and cut a V-shaped notch on one end for the third and final wingcase.
Step 25
Tie-in the third wingcase the same way you did with the first and second.
Step 26

Dub over your thread-wraps and then dub forward in front of the rubber legs and directly behind the beadhead.
Step 27

Whip finish and tie-off your thread.
Step 28

Add head cement to your thread wraps and cut off any excess dubbing fibers.
Step 29
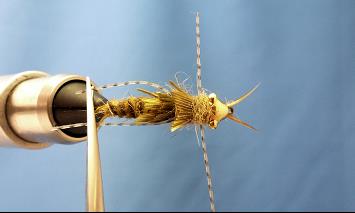

Trim the legs so that they are equal length as shown.
Step 30

Go catch a big fish!