Evolution Mayfly Pheasant Tail
Nymphs: Step-by-step fly tying instructions.

The Mayfly Pheasant Tail is an essential swimming mayfly nymph and should be in every anglers fly box. The Evolution™ Mayfly Pheasant Tail version is tied in the traditional way, but is now enhanced by using an Evolution™ Mayfly Swimmer & Burrower tungsten beadhead and modern blended dubbing for the thorax.

Color variations
Brown and olive.
Fly tying materials
Head: Nymph-Head® Evolution™ Mayfly Swimmer & Burrower tungsten beadhead, brown or olive, extra-small, small, medium, or large.
Hook: Standard nymph hook 2XL; #12 for large bead, #14 for medium, #16 for small, #18 for extra-small.
Thread: Brown or olive.
Lead wire: Standard.
Rib: Ultra wire, copper or green.
Tail: Pheasant tail, brown or olive.
Abdomen: Pheasant tail, brown or olive.
Thorax: Hareline Hare'e Ice Dubbin; brown or olive/brown.
Wingcase: Pheasant tail, brown or olive.
Legs: Pheasant tail, brown or olive.
Fly tying instructions
Step 1

Slip the Evolution beadhead onto hook, and position the hook in vise. Wrap 3 or 4 turns of lead-wire onto the hook.
Step 2

Push the lead-wire forward and position inside the back of the bead. This helps shape the thorax and add weight to the fly.
Step 3


Attach tying thread and wrap a strong base layer of thread over the lead wire and shank of the hook.
Step 4

Tie in ultra wire for the ribbing.
Step 5


Take a small clump of pheasant tail fibers for the tail and tie-in at the back of the hook.
Step 6

Holding the pheasant tail fibers together, wrap them forward to create the abdomen.
Step 7

Trim off the ends and tie-off.
Step 8


Rib the abdomen of the fly by wrapping ultra-wire forward in the opposite direction of the pheasant tail. Cut off the excess wire and tie off securely.
Step 9


Tie in several pheasant tail fibers for the wingcase and trim off the butt ends.
Step 10


Dub a tight thorax.
Step 11

Pull the pheasant tail fibers forward and over the dubbing to create the wing case of the fly. Tie down the pheasant tail directly behind the bead. Separate the pheasant tail fibers on both sides.
Step 12

Position the pheasant tail on either side of the bead and facing slightly downwards. These will represent the legs of the fly. Make several whip finishes with your thread to secure the pheasant tail in position.
Step 13

Whip finish and cut your thread.
Step 14

Add head cement to your thread wraps and wingcase.
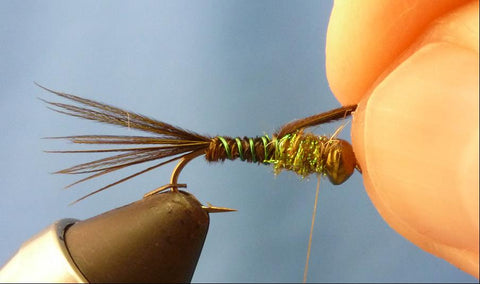
Step 15


Go catch a big fish! The Evolution Mayfly Pheasant Tail is complete!