Evolution Mayfly Clinger
Nymphs: Step-by-step fly tying instructions.
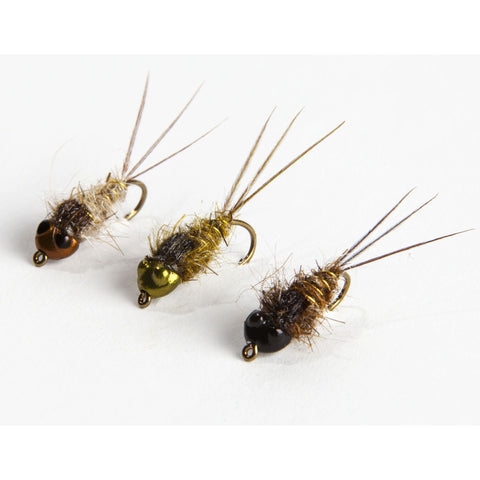
The Evolution™ Mayfly Clinger is a simple Hare’s Ear-style nymph pattern designed to imitate mayfly clinger nymphs. It's tied using modern hare’s ear blended dubbing and a Nymph-Head® Evolution™ Mayfly Clinger & Crawler tungsten beadhead to imitate the broad, flat profile typical of these nymphs.
Color variations
Tan, brown/olive, and brown.
Fly tying materials
Head: Nymph-Head® Evolution™ Mayfly Clinger & Crawler tungsten beadhead, brown (for tan variation), olive (for brown/olive variation, black (for brown variation), extra-small, small, medium, or large.
Hook: Standard nymph hook 2XL; #12 for large bead, #14 for medium, #16 for small, #18 for extra-small.
Thread: Tan, olive, or brown.
Lead-free wire: Standard.
Rib: Ultra wire, gold.
Tail: Pheasant tail; natural, olive, or brown.
Abdomen: Hareline Hare's Ear PLUS Dubbin; Hare's ear, brown/olive, or chocolate brown.
Thorax: Hareline Hare's Ear PLUS Dubbin; Hare's ear, brown/olive, or chocolate brown.
Wingcase: Pheasant tail; natural, olive, or brown.
Fly tying instructions
Step 1

Slip Evolution beadhead onto hook, and position hook in vise. Attach tying thread directly behind beadhead.
Step 2

Tie in two straight lengths of lead-free wire on both sides of the hook shank to create a flat, broad body profile. Each strip should be about half the length of the hook shank.
Step 3


Push the ends of the lead-free wire inside the beadhead and cover completely with your tying thread. Using this technique ensures that from the top, the fly has a broad, flat profile typical of Clinger nymphs. It also keeps the beadhead in a horizontal position and stops it from spinning around the hook shank. From the side, the fly has a very narrow, thin profile.
Step 5

Tie in a piece of ultra wire for the ribbing.
Step 6


Select 3 strong pheasant fibers for the tail and tie them in.
Step 7

Use figure-eight wraps with your thread to separate the 3 tails as shown. Use a drop of head cement to help hold the fibers in place.
Step 8


Dub the abdomen with the hare’s ear dubbing.
Step 9

Wrap the ultra wire forward to rib the abdomen and tie it off. Take your scissors and trim the abdomen to a neat shape.
Step 10


Select a clump of pheasant tail fibers to use for the wing case of the fly and tie them in.
Step 11

Use more hare’s ear dubbing to tie a hairy, buggy thorax. Brush and pull out bits of spiky dubbing for the legs.
Step 12

Pull the pheasant tail fibers forward and over the thorax to create the wing case.
Step 13

Tie off the wing case directly behind the beadhead using several thread wraps.
Step 14

Trim off the excess pheasant tail.
Step 15

Whip finish and tie off the thread. Add head cement.
Step 16

Trim the top and bottom of the fly to create a thin side profile.
Step 17


You're done! Go catch a big fish.